I had some burlap fabric that I coated with mod podge in hopes of making tan flowers like the ones I made here. I think it's a bit too late to be making flowers now when all I keep thinking about is holiday crafts.
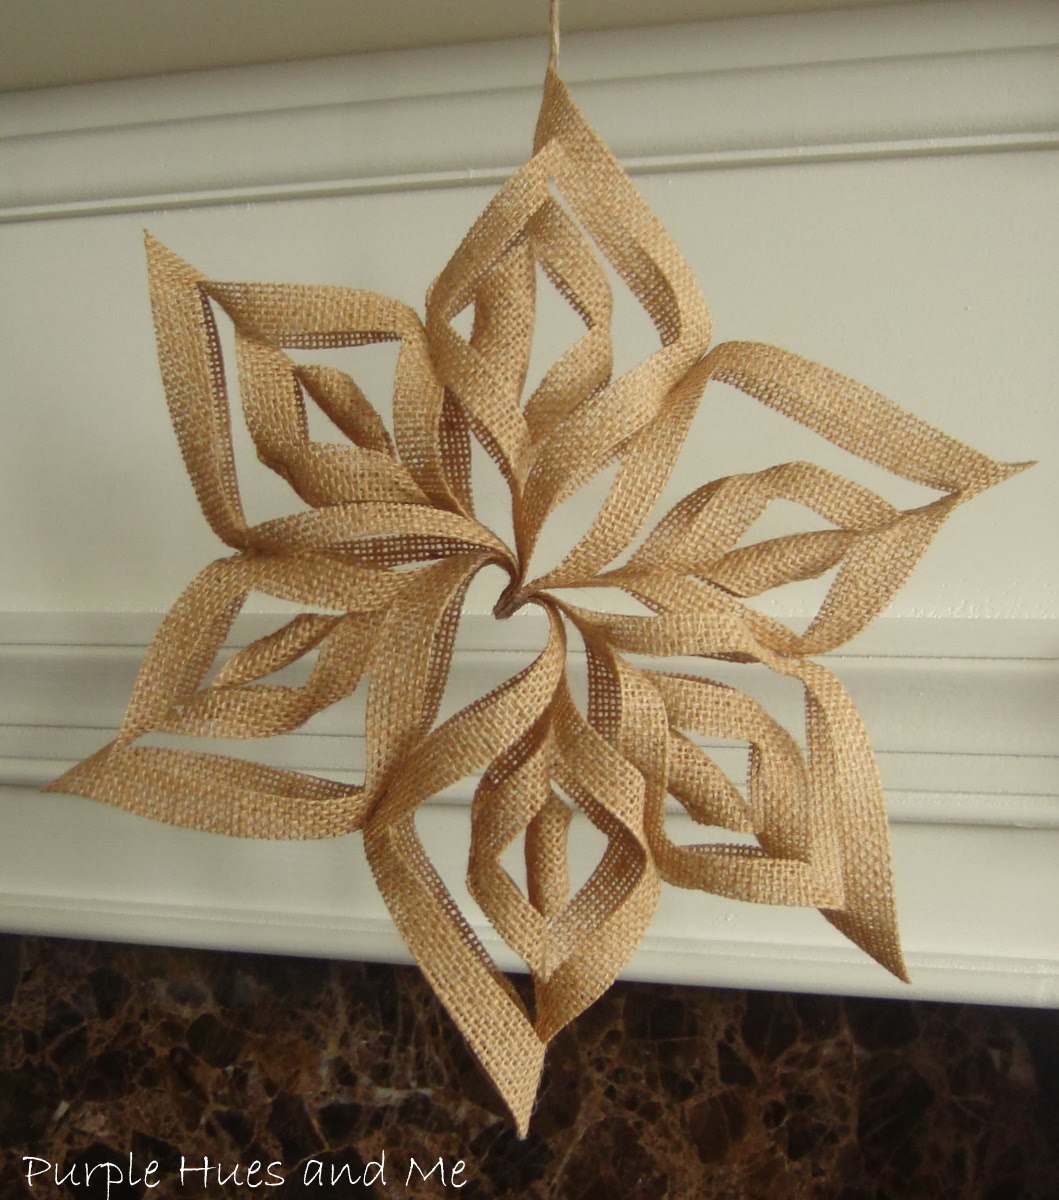
Everybody loves snowflakes and we definitely could start having some real ones at any moment around here. After all, it is November. I'm sure you've seen the 3D paper snowflakes that are so popular across the internet. I made one out of burlap which makes for an awesome holiday ornament.
Here's how I did it: Using burlap, mod podge, scissors, ruler, and hot glue . . .
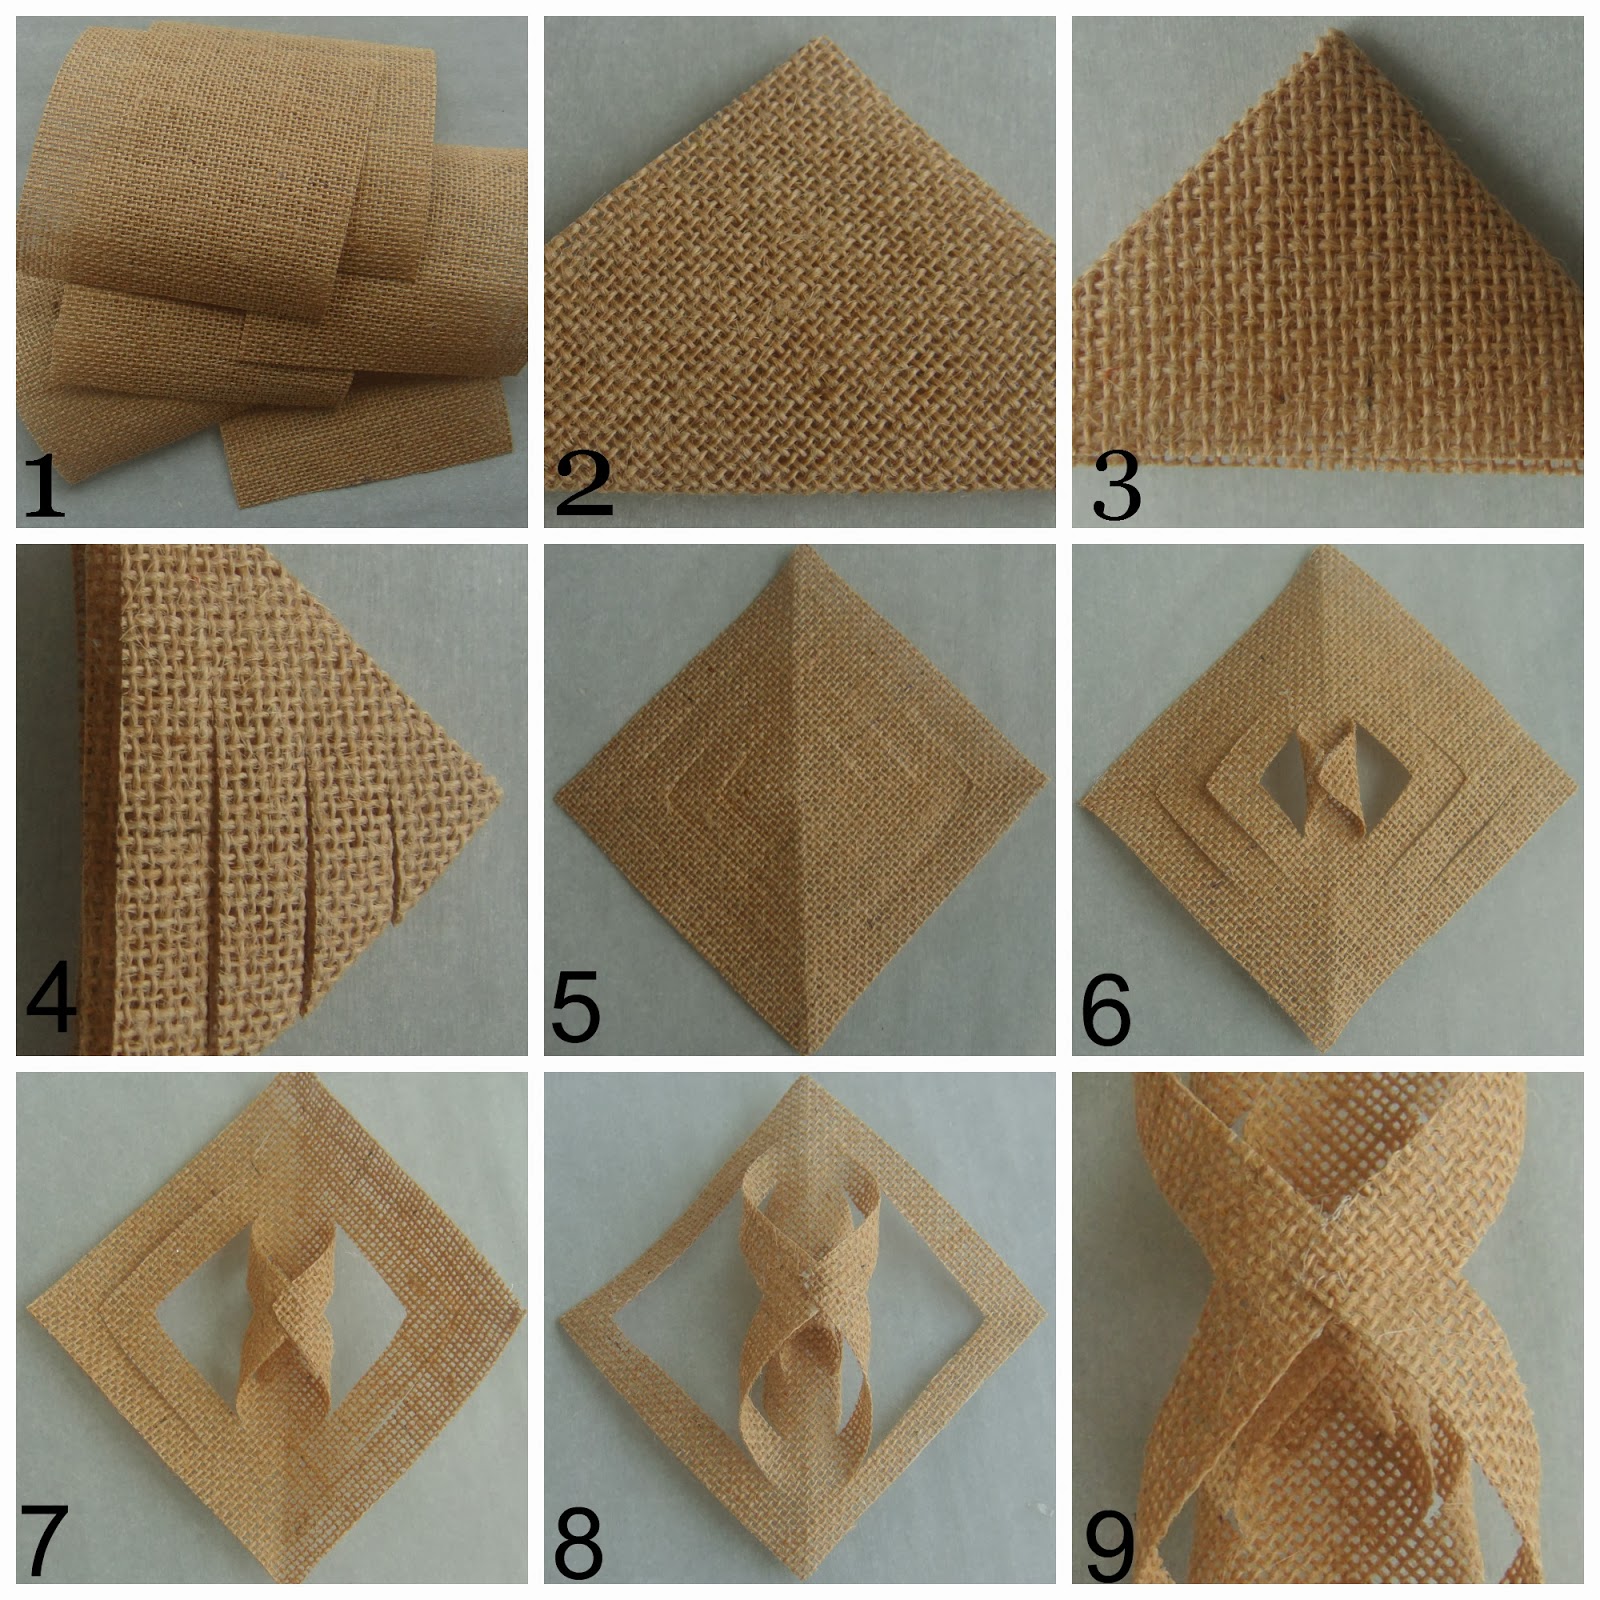
1. Cut out six 4 inch squares of stiffen burlap ( I coated burlap with mod podge and let dry)
2. Fold a burlap square in half, diagonally to form a triangle.
3. Fold the triangle in half again.
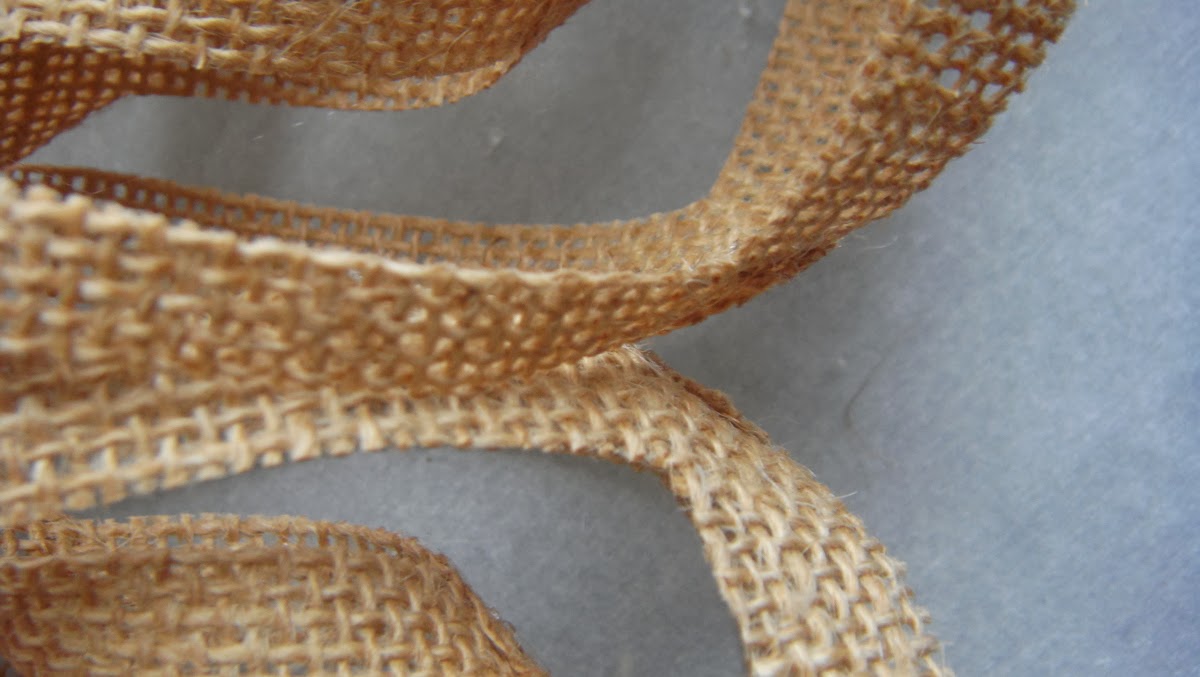
4. Cut three lines in the "folded" area of the triangle, parallel to the edge of the triangle, stopping just short of the edge (1/4").
5. Unfold the triangle. You should see cut lines in the shape of a diamond.
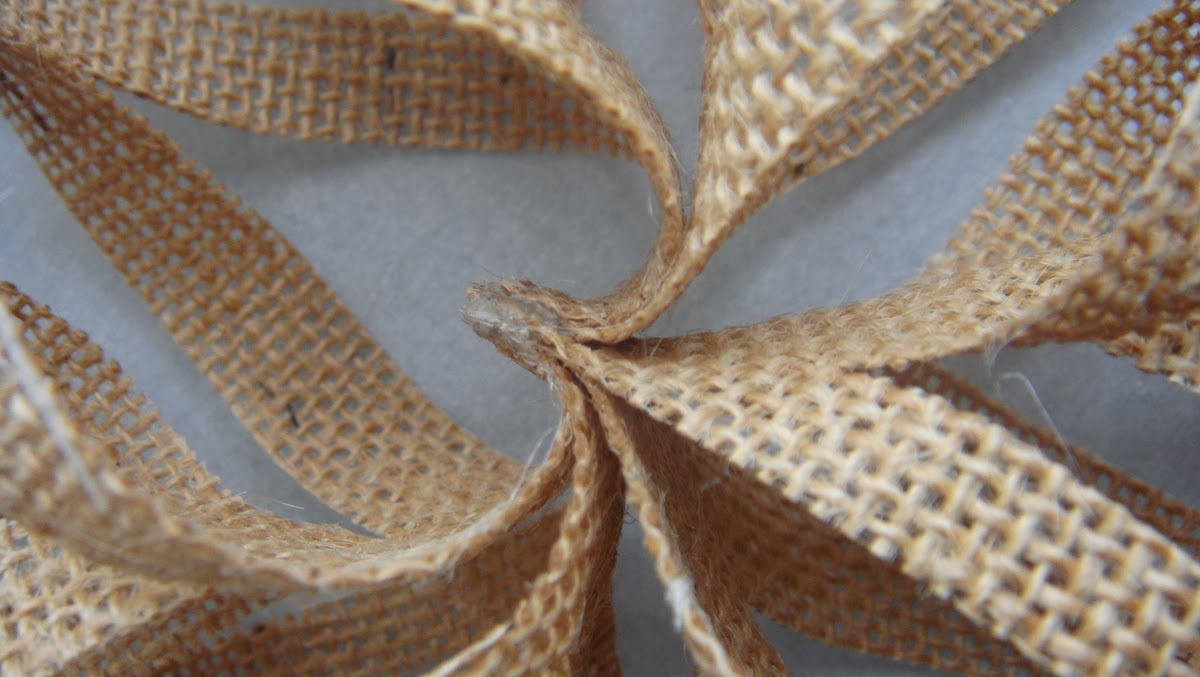
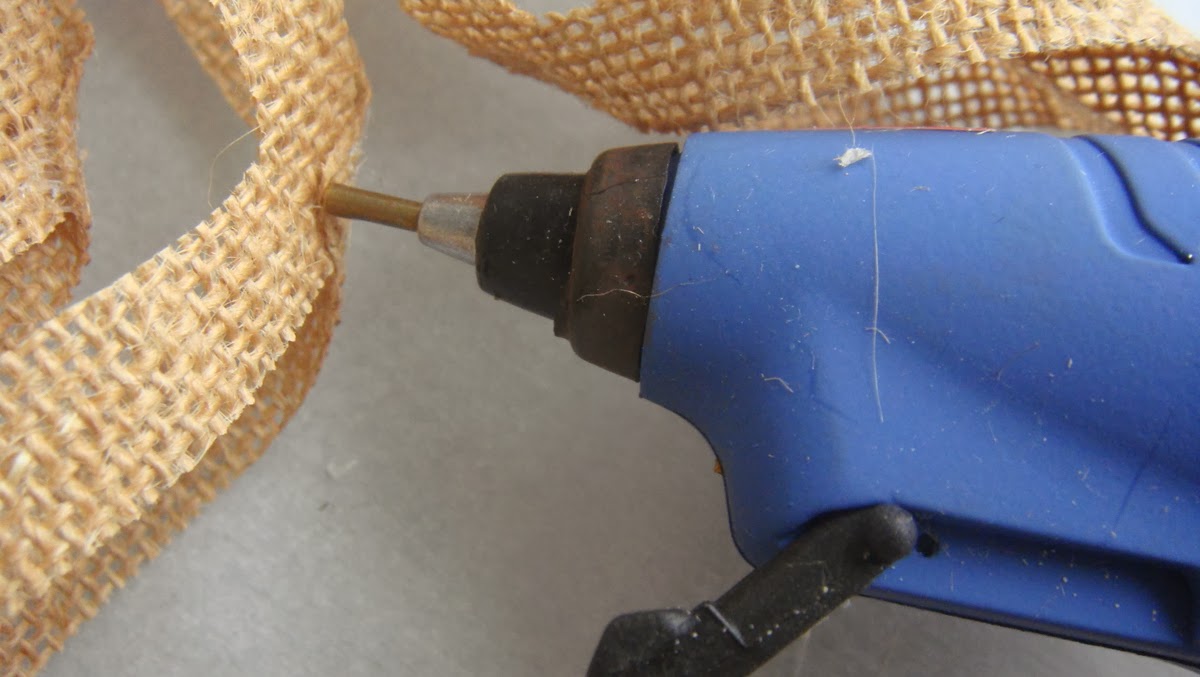
6. Glue the edges of the innermost cut lines (smallest) together forming a tube.
7. Turn the burlap square over to the other side and glue the next two edges together as before. Larger than the previous one.
8. Keep turning over the burlap and gluing the edges to form a curve shape.
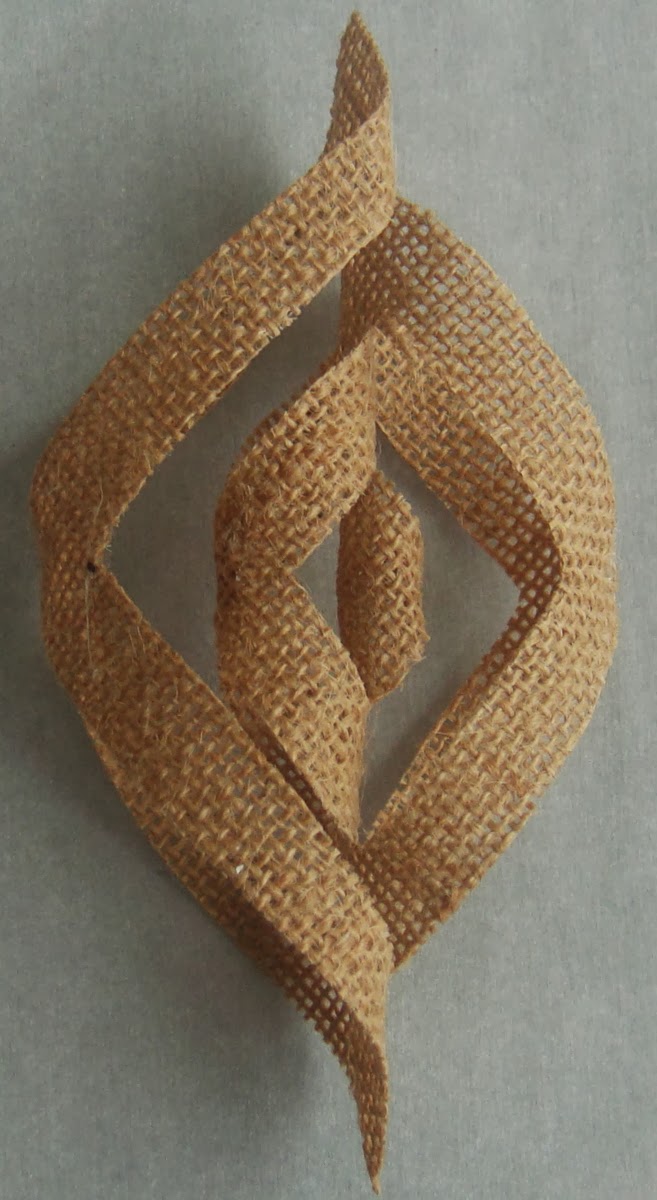
9. All the edges have been joined creating one "arm" of the snowflake. . .
so beautiful!
Repeat the same process for each of the remaining 5 burlap squares.
Glue three of the glued burlap arms together at one end and glue the remaining arms together the same way. Then glue the two sets together at the ends.
Glue where each of the six burlap strands meet. . .
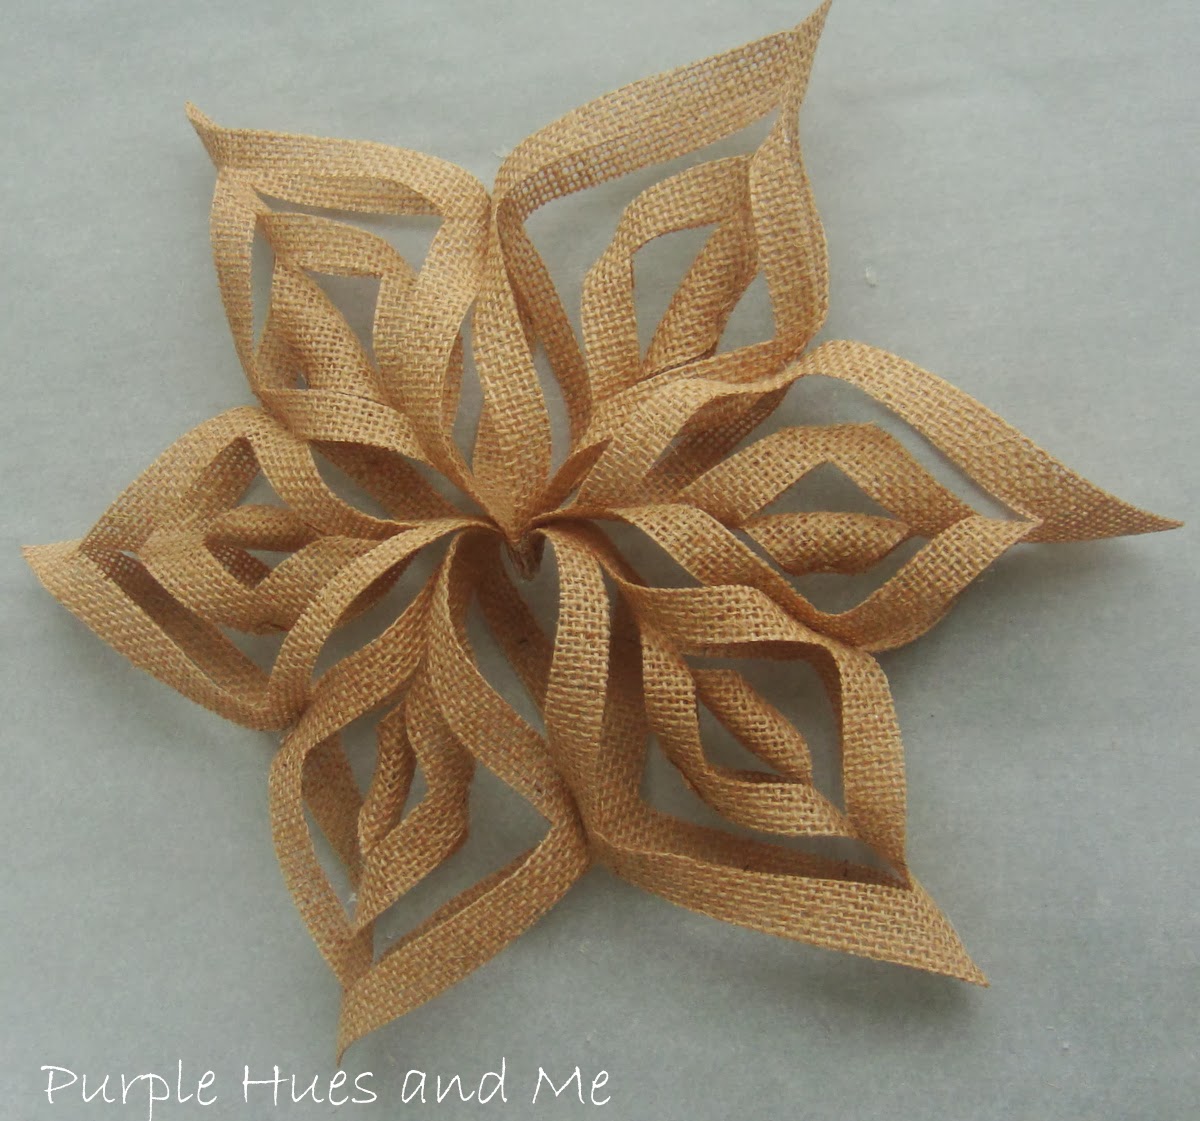
So that the snowflake (six arms together) shape is formed.
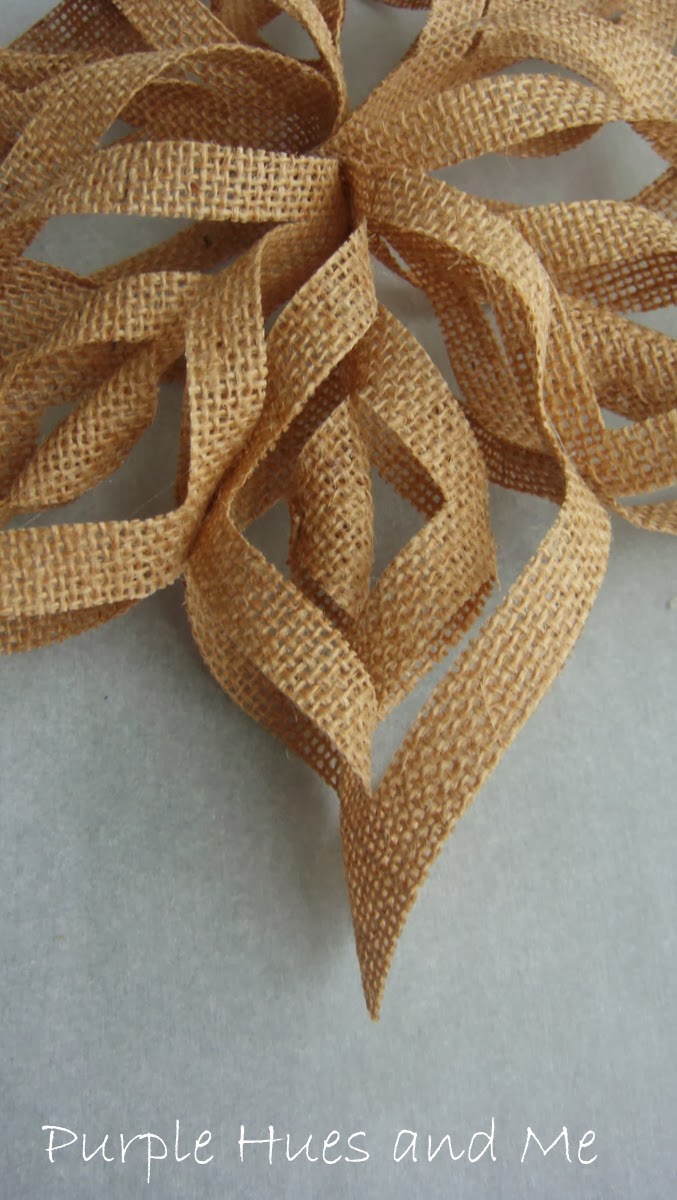
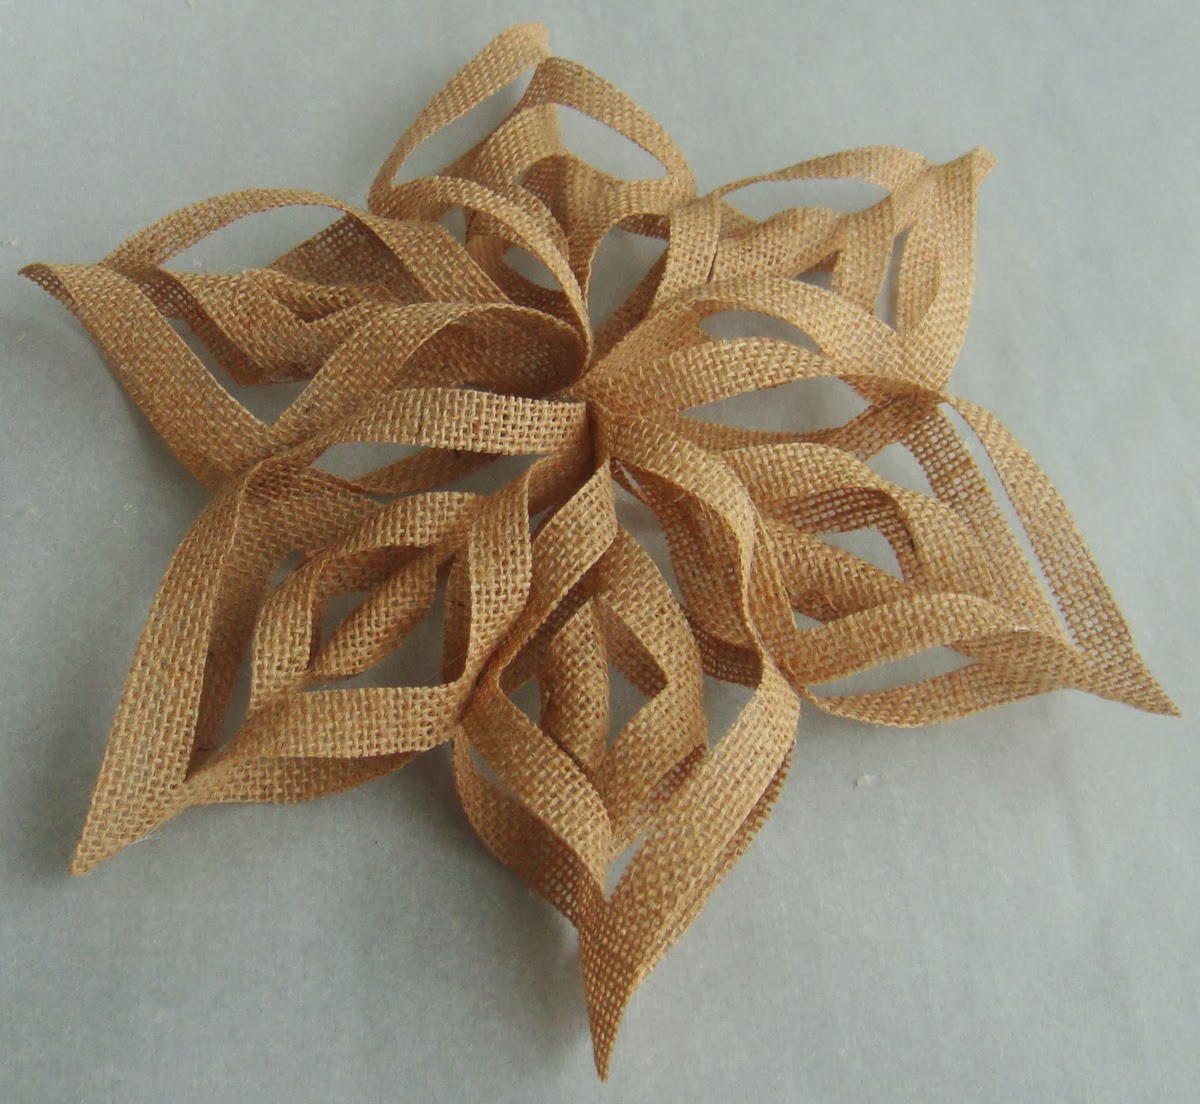
So pretty!

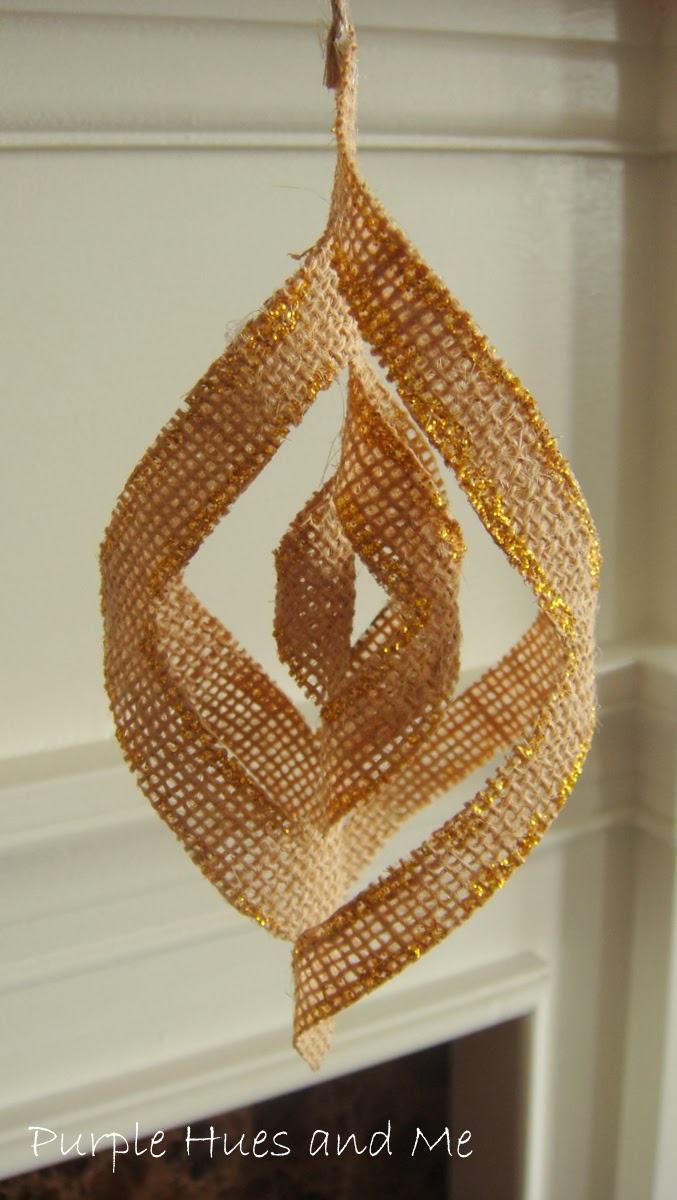
I love the look of just a single arm of the snowflake.
These can be hung individually . . .
with a hint of sparkle
or grouped together for a large snowflake. . .
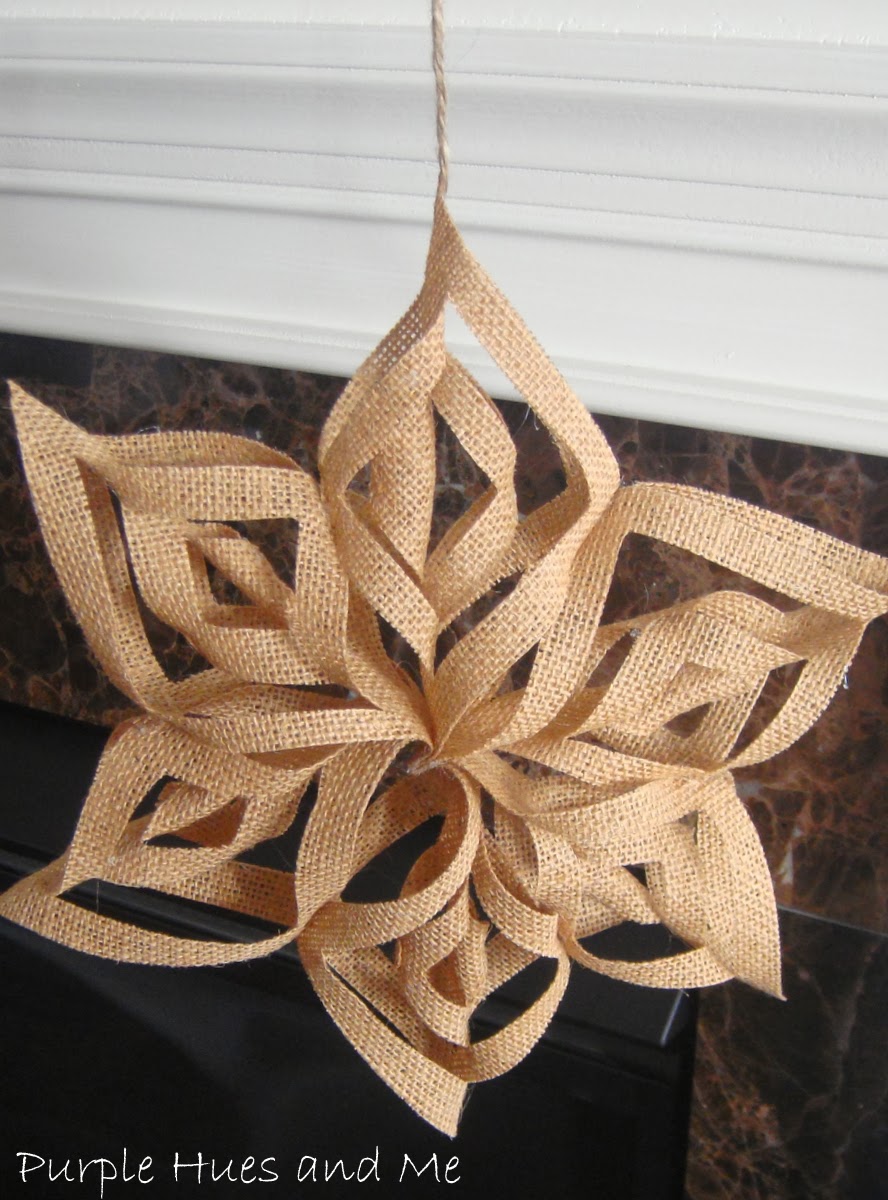
3D burlap snowflakes are so much better than the paper ones. Wouldn't they look fabulous on a tree with a rustic theme, hanging as ornaments or as a tree topper? Why not add some glitter for a bit of sparkle or hang on the fireplace or perhaps in front of a window for a winter wonderland effect?
So many possibilities. . .
Take a little time to enjoy,

Linking
To Some of My Fav Parties:
Mellywoods Mansion for Raising Imperfections Party , By Stephanielynn for the Sunday Showcase Party , The Tablescaper for Seasonal Sunday , VMG206 for DIY Sunday Showcase , Sewing Barefoot for The Weekly Creative, Alderberry Hill for Make the Scene Monday , Clairejustineoxox for Creative Mondays , Craft and Repeat for On Display Monday Link Party , The Dedicated House for Make It Pretty Monday , Feeding Big and more for In and Out of the Kitchen Monday , I Should be Mopping the Floor for Mopping It Up Monday , Making the World Cuter for Making the World Cuter Monday , Newlywed Pilgrimage for Moonlight Mason Jars linky party Monday Night , So Much Better with Age for Give Me The Goods Party , Thrifty Decor Chick for Before and After Monday , Boogieboard Cottage for Masterpiece Monday , Between Naps on the Porch for Metamorphosis Monday , Home Coming for DIY'ers , I Gotta Try That for Linky Party Monday, Mod Vintage Life for Mod Mix Monday , Pursuit of Funtional Home for Monday Hop , One More Time for Share It One More Time , Twelve O Eight for Pretty Things Linky Party Monday , Todays Creative Blog for Get Your Craft On , Be Betsy for Brag About It Tuesday , DIY Dreamer for From Dream to Reality , Flusterbuster for Creative Muster Tuesday , Kathe With A E for You're Gonna Love It Tuesday , The Stories of A2Z for Tutorials and Tips Tuesday , Coastal Charm for Nifty Thrifty Tuesday , A Stroll thru Life for Tabletop Inspire Me Tuesday , Cedar Hill Ranch for The Scoop on Tuesdays ,Homework for Inspiration Board Tuesday , My Uncommon Slice of Suburbia for Tuesday's Treasures , Romance on a Dime for Take on Tuesday , Debbiedoos for Tuesdays Top Talent Pinterest Party , Hickory Trail for Assets and Efforts , Hope In Every Season for Make,Bake,Create , Mad Cap Frenzy for Totally Tuesday Link Party , VMg206 for Brag About It Tuesday , Love Grows Wild for Time to Sparkle , The Blissful Bee for Work It Wednesday , Cass-Eats for Linky & Drinky Wednesday , Our Home Away from Home for Tuesdays at Our Home , Eclectic Red Barn for The Pinterest Power Party , Ivy and Elephants for What's It Wednesday , Primp for Primp Your Stuff Wednesdays , Ginger Snap Crafts for Wow Me Wednesdays ,
Life With the CrustCutOff for Two Girls and a LinkUp , Pink Recipe Box for Creative Wednesdays , Savvy Southern Style for Wow Us Wednesdays ,The Shady Porch for Rock and Share Wednesdays , The Taylor House for Pinterest Power Party Wednesday , We Like To Learn As We Go for What I Learned Wednesday , The Style Sisters for Centerpiece Wednesday , DIY by Design for Swing into Spring , All Things With a Purpose for Thursday Link Up , Krafty Cards,Etc. for Krafty Inspirations Thursday , CSI Project for Challenge of the Week Thursday , Dysfunction Junction for Linkin With My Ladies Thursday , I Gotta Create for Wildly Original Linky Party The Frugal Girls for Chic and Crafty Party , Glued To My Crafts for Thursdays Obsessions , Lamberts Lately for Create It Thursday , Katherine's Corner for Thursday Favorite Things Blog Hop , A Peek Into My Paradise for TGIF Link Party , The Shabby Creek Cottage for Transformation Thursdays , The Home Acre Harvest Hop , Marigold's Loft for Tutorial Thursdays , My Fashion Forward Blog for All Things Pretty , No Minimalist Here for the Open House Party on Thursdays , Posed Perfection for All Things Thursday , Sparkles and a Stove for All Things Pretty Thursday , Stone Gable for Tutorials, Tips and Tidbits on Thursdays , Chic on a Shoestring Decorating for Flaunt It Friday , The Dedicated House for Anything Blue Friday . Happy Go Lucky for Shine on Fridays , Jennifer Rizzo for Fabulously Creative Friday , My Romantic Home for Show and Tell Friday , French Country Cottage for Feathered Nest Friday , Common Ground for Be Inspired on Fridays , The Charm of Home for Home Sweet Home Friday , Craftberry Bush for the Inspiration Gallery on Friday , Diana's Rambles for Pin Me Linky Friday 504 Main for Tickled Pink Fridays , Happy Go Lucky for Shine on Friday , Happy Hour Projects for Happy Hour Friday , Mellywoods Mansion for Freaking Awesome Fridays , Obsessive and Creative for Craft Frenzy Friday , Rooted in Thyme for Simple & Sweet Fridays , See Vanessa Craft for do something crafty Friday , Shaken Together for What's Shakin' Friday , Whipperberry for Friday Fair Link Party , DIY Showoff for That DIY Party , Funky Junk Interiors for Saturday Nite Special, Love of Family & Home for Inspire Me Please Weekend , A Bouquet of Talent for Life on Lake Shore Drive on Saturdays , Classy Clutter for Spotlight Saturday , Crafts a la Mode for What To Do Weekends , Debbiedoo's for Get Blitzed on Pinterest , It's Overflowing for Share Your Creativity Saturday , Just Us Four for Pinworthy Projects Party Friday , Mommifried for Ladies Only Blog Share Link Party , My Snippets of Inspiration for Pin It Saturday , Natasha in Oz for #Say Gday Saturday Linky Party , One More Time for Share It One More Time Saturday , Rosevine Cottage Girls for Weekend Blog Hop , Serenity You for Serenity Saturday , Tutus & Tea Parties for a Pinteresting Party


You are a GENIUS!! I love this SO much! I am going to start mod podging my burlap now.
ReplyDeleteSo very very cool!
Gail, This is amazing! My kids used to make these in school out of paper, but burlap?? Wow, what impact! Love them! :) Kim @ Exquisitely Unremarkable
ReplyDeleteThank you so much! That is what I'm looking for.
ReplyDeleteYou are one talented lady!! I've seen this done with scrapbook paper, but this one take the cake! Love it!
ReplyDeleteTotally love this snowflake! Just gorgeous!! And your photos are always amazing!
ReplyDeleteBeautiful!!!!!!!!!!!!!!!!!!!!!!!!!!!! We invite you to come and link this up to our blog here : http://rosevinecottagegirls.blogspot.com/2013/10/photos-from-cottage-link-up-3.html
ReplyDeleteLove this! So pretty. Please tell me about your glue gun, thanks ~ Jenn
ReplyDeleteThanks, Jenn! It's a narrow point glue gun by Surebonder. I think I got it at JoAnn's using a coupon. I use it when I need just a little bit of glue to hold things.
DeleteLove this! Cannot wait to make some.
ReplyDelete
ReplyDeleteWow! Thank you so much for sharing how to make these! I love them and will def be making a lot of them!!
I may try this by lightly dusting the burlap with white spray paint and letting the burlap show through. It would still have a rustic look but take on a "snowy" appearance. This would also make a great template to make pointsettias with a different medium such as double sided scrap book paper, felt or other fabric. Hmmmm....I think I need to clear off all the junk that's accumulated on my craft table and get going on this! Thanks so much for posting this project!
ReplyDeleteOh my gosh is this stunning! I need to make one of these for the holidays. Thank you for the how-to.
ReplyDeleteOh wow that's amazing???? I really want to try that!
ReplyDeleteThese are beautiful! You are so talented! Snowflakes are one of my favorite Holiday decorations!
ReplyDeleteJemma
LOVE that you made this out of burlap, so cute!
ReplyDeleteOMG that is amazing! Please tell me you are selling those, LOL...I am sooo pinning this to pinterest.
ReplyDeleteYou rock, I am going to have to try this!
LOVE IT!! If you haven't already I would love for you to link up to my weekly linky party. http://www.somedayilllearn.com/2013/11/04/teach-tuesday-40/
ReplyDeleteIncredible!! I bought some burlap a while ago without any plans for what I was going to do with. Now I know what I'm going to do!
ReplyDeleteDid you put the modpodge on before cutting the squares? And, did you put the modpodge on front and back of the burlap? Thanks so much!
ReplyDeleteI coated the burlap just on one side with mod podge to make flowers which I never did. You know how we start and stop projects before completing. Thought of using the coated burlap when I was looking for snowflakes to make for another project I'm working on.
Delete**
ReplyDeleteThey are just gorgeous! Thanks for the how to, I think I'll give them a try.
ReplyDeleteGail! These are so fabulous!!! Thanks so much for sharing the tutorial with us...I just HAVE to make some of these for Christmas. You are just full of great ideas! I saw your post over at " A Stroll Thru Life" blog party...your thumbnail just jumped out at me...I didn't know it was you till I clicked on the picture.
ReplyDeleteVery pretty!! I love snowflakes and they are so country and homey out off burlap. Pinned! Visiting from The Scoop
ReplyDeleteYour burlap snowflake is so pretty I want to make some for Christmas gifts! Thanks for the "how to"! Visiting from MMM.
ReplyDeleteMy girls have made these snowflakes in the past but with just plain white paper. The burlap adds a whole different dimension. A nice change! Visiting from 'FlusterBuster' link up (I'm #193).
ReplyDeleteGreat tutorial! thanks so much for sharing :) http://www.handmadeintheheartland.com
ReplyDeleteThis is such a creative use for burlap! There are so many burlap projects out there, but I have never seen one like this. I LOVE it! Thank you so much for linking up at Get Your DIY On! I hope to see you back on Sunday at 7pm EST to link up your furniture transformations! Hope you're having a wonderful week!
ReplyDelete~Abby =)
Pinned!! I love this Gail and I have to say the one with just a little sparkle is lovely!
ReplyDeleteWow gail your talents never cease to amaze me! I wouldn't have guessed how to make something like this, but your tutorial cleared it up for me! I rarely use my Pinterest but I think I'll post this because it's great!
ReplyDeleteWow! This is amazing! I would love it if you would link up to my link party at http://ihearthandson.blogspot.ca/2013/11/show-off-fridays-3.html
ReplyDeleteHave a great weekend!
Pardon my ignorance ,but what on earth is mod podge?
ReplyDeleteThat is beautiful! I can't wait to try it!!! Thanks for such great instructions.
ReplyDeleteSo pretty! I love it. :-)
ReplyDeleteStopping by to Thank you for sharing at One More Time Events and let you know you have been featured http://www.onemoretimeevents.com/2013/11/dessert-display-with-flour-sack.html. Party is up hope you can stop by and share some more of your great ideas....Hugs Tammy
ReplyDeleteThat is absolutely gorgeous, they will be stunning on the tree.
ReplyDeleteYour snowflake is lovely, very rustic looking. I never thought of mod podging the burlap, but I think I'm going to have to try that!! Thanks for sharing! Have a great weekend! ~Lorraine ♥♥♥
ReplyDeleteI know I say this every time you make an ornament or bauble that it is my favorite, but I do not think you can top this one. It is so wonderful. The burlap snowflake is number one of all you have done.
ReplyDeleteThat is amazing! I bet it's not as easy as you make it look. :)
ReplyDeleteHi lovely lady.
ReplyDeleteI love your snowflake you did a great job putting this together.
Diane
What size is the finished star? I think these would look great hanging in my dining room windows, but they would have to be large enough.
ReplyDeleteThanks!
It's really a good size to hang in windows -about 10 inches all around. Increase the square size to 5 or 6 inches and you will have a huge snowflake. For larger squares, you will have to make more slits to roll.
ReplyDeleteThis is so pretty! Thanks for posting the tutorial. Definitely pinning.
ReplyDeleteOh, goodness, these are amazing! I must give these a try- thank you for an excellent tutorial, Gail.
ReplyDeleteThis is absolutely gorgeous! And what a brilliant idea to coat it in mod podge. I love love this!
ReplyDeleteI love these! I never knew how to make them. I pinned your how-to to my Christmas Crafts for Kids board. I'm going to try making them with my bigger kids.
ReplyDeleteI love the burlap snowflake, and hope to make some this weekend. I am doing a small rustic tree and these will work well!
ReplyDeleteI tried making a snowflake last evening. What type of glue did you use on the edges to make the tubes? I used Elmers but it didn't dry quick enough and the four tubes kept springing open. I felt like I would need some mini clothes pins or something to hold it together while it dried. What was your trick? LOL
ReplyDeleteHa! Sorry, no trick, just used a glue gun putting a little bit to hold. There's a picture of doing this included in my post. If you want to use regular glue I would recommend Aileen's Fast Grab Tacky Glue. I love this and it should work just fine.
DeleteAll I can say is AWESOME!
ReplyDeleteThank you for sharing your tutorial, these snowflakes are absolutely perfect! I have pinned and will be trying this. Great project!
ReplyDeleteDebbie :)